이번 영상에서는 Navigation의 Safe Args 기능을 이용해 프래그먼트 사이에서 데이터를 전달하는 방법에 대해 알아보도록 하겠습니다.
¶ 책 검색 결과를 웹뷰에 표시하기
카카오 책 검색 API는 각 책마다 책 검색결과 url을 같이 반환합니다. Book 클래스의 url 속성이 그 정보를 가지고 있지요. 그래서 여기서는 SearchFragment의 아이템을 클릭하면, 해당 아이템의 url 값을 넘겨받아 WebView로 보여주는 프래그먼트를 만들어 보도록 하겠습니다.
우선은 Safe Args 사용을 위해 다음과 같이 Safe Args Dependency를 추가합니다.
// top 레벨의 build.gradle
plugins {
+    id 'androidx.navigation.safeargs.kotlin' version '2.4.1' apply false
}

// app 레벨의 build.gradle
plugins {
+    id 'androidx.navigation.safeargs.kotlin'
}
¶ BookFragment 작성
다음은 BookFragment를 작성하겠습니다. ui/fragment 아래에 BookFragment를 추가하고 화면을 다음과 같이 구성합니다.
<?xml version="1.0" encoding="utf-8"?>
<androidx.constraintlayout.widget.ConstraintLayout xmlns:android="http://schemas.android.com/apk/res/android"
    xmlns:tools="http://schemas.android.com/tools"
    android:layout_width="match_parent"
    android:layout_height="match_parent"
    tools:context=".ui.fragment.SettingsFragment">

    <WebView
        android:id="@+id/webview"
        android:layout_width="0dp"
        android:layout_height="0dp"
        app:layout_constraintBottom_toBottomOf="parent"
        app:layout_constraintEnd_toEndOf="parent"
        app:layout_constraintStart_toStartOf="parent"
        app:layout_constraintTop_toTopOf="parent" />

</androidx.constraintlayout.widget.ConstraintLayout>
Safe Args로 전달할 Book 클래스는 직렬화가 가능해야 하기 때문에 Parcelable을 상속받게 합니다. Parcelable은 Serializable보다 속도면에서 우위지만 보일러 플레이트 코드를 구현해야 한다는 단점이 있는데 Parcelable implementation generator를 사용하면 보일러플레이트 코드를 신경쓸 필요가 없습니다.
// build.gradle
plugins {
+    id 'kotlin-parcelize'
}

// Book.kt
+ @Parcelize
data class Book(
...
+ ) : Parcelable
다음은 BookFragment의 라벨값을 string.xml에 정의합니다.
<resources>
+    <string name="book_info">Book Info</string>
</resources>
Navgraph UI에서 BookFragment를 추가하고 라벨을 정의한 뒤 Book을 argument로 받을 수 있도록 설정합니다. SearchFragment와 BookFragment를 연결한 뒤 action을 추가합니다. 나중에 사용할 FavoriteFragment에도 동일한 작업을 해 줍니다. UI에서 작업한 내용은 다음과 같이 자동으로 코드화 됩니다.
<?xml version="1.0" encoding="utf-8"?>
<navigation xmlns:android="http://schemas.android.com/apk/res/android"
    xmlns:app="http://schemas.android.com/apk/res-auto"
    xmlns:tools="http://schemas.android.com/tools"
    android:id="@+id/booksearch_nav_graph"
    app:startDestination="@id/fragment_search">

    <fragment
        android:id="@+id/fragment_favorite"
        android:name="com.example.booksearchapp.ui.view.FavoriteFragment"
        android:label="@string/favorite"
        tools:layout="@layout/fragment_favorite">
+        <action
+            android:id="@+id/action_fragment_favorite_to_fragment_book"
+            app:destination="@id/fragment_book"
+            app:enterAnim="@anim/nav_default_enter_anim"
+            app:exitAnim="@anim/nav_default_exit_anim"
+            app:popEnterAnim="@anim/nav_default_pop_enter_anim"
+            app:popExitAnim="@anim/nav_default_pop_exit_anim" />
    </fragment>
    <fragment
        android:id="@+id/fragment_search"
        android:name="com.example.booksearchapp.ui.view.SearchFragment"
        android:label="@string/search"
        tools:layout="@layout/fragment_search">
+        <action
+            android:id="@+id/action_fragment_search_to_fragment_book"
+            app:destination="@id/fragment_book"
+            app:enterAnim="@anim/nav_default_enter_anim"
+            app:exitAnim="@anim/nav_default_exit_anim"
+            app:popEnterAnim="@anim/nav_default_pop_enter_anim"
+            app:popExitAnim="@anim/nav_default_pop_exit_anim" />
    </fragment>
    <fragment
        android:id="@+id/fragment_settings"
        android:name="com.example.booksearchapp.ui.view.SettingsFragment"
        android:label="@string/settings"
        tools:layout="@layout/fragment_settings" />
+    <fragment
+        android:id="@+id/fragment_book"
+        android:name="com.example.booksearchapp.ui.view.BookFragment"
+        android:label="@string/book_info"
+        tools:layout="@layout/fragment_book">
+        <argument
+            android:name="book"
+            app:argType="com.example.booksearchapp.data.model.Book" />
    </fragment>

</navigation>
¶ 리사이클러뷰에 클릭 리스너 설정
다음은 SearchFragment의 검색결과를 터치했을 때 데이터를 전달하도록 하면 됩니다. 우선은 BookSearchAdapter에서 각 ViewHolder에 대해 다음과 같이 클릭 리스너를 구성해 줍니다.
class BookSearchAdapter : ListAdapter<Book, BookSearchViewHolder>(BookDiffCallback) {
    ...
    override fun onBindViewHolder(holder: BookSearchViewHolder, position: Int) {
        val book = currentList[position]
        holder.bind(book)
+        holder.itemView.setOnClickListener {
+            onItemClickListener?.let { it(book) }
+        }
    }

+    private var onItemClickListener: ((Book) -> Unit)? = null
+    fun setOnItemClickListener(listener: (Book) -> Unit) {
+        onItemClickListener = listener
+    }
    ...
}
그리고나서 SearchFragment의 setupRecyclerView에서 클릭 리스너를 설정하고, Safe Args에 의해 자동으로 만들어진 action 클래스를 navigate()로 전달하면 됩니다.
private fun setupRecyclerView() {
    ...
+    bookSearchAdapter.setOnItemClickListener {
+        val action = SearchFragmentDirections.actionSearchFragmentToBookFragment(it)
+        findNavController().navigate(action)
    }
}
¶ BookFragment 구성
마지막으로 BookFragment에 View Binding과 WebView를 설정합니다. by navArgs()를 이용해 args를 초기화하고 전달받은 url 값을 WebView로 표시하면 됩니다.
마지막으로 onPause와 onResume에서 라이프사이클에 따른 웹뷰동작을 정의하면 됩니다. 이 때 Constructive first, destructive last 룰에 따라 super() 생성자의 위치를 정해줍니다.
class BookFragment : Fragment() {
    private var _binding: FragmentBookBinding? = null
    private val binding get() = _binding!!

    private val args by navArgs<BookFragmentArgs>()

    override fun onCreateView(
        inflater: LayoutInflater,
        container: ViewGroup?,
        savedInstanceState: Bundle?,
    ): View? {
        _binding = FragmentBookBinding.inflate(inflater, container, false)
        return binding.root
    }

    @SuppressLint("SetJavaScriptEnabled")
    override fun onViewCreated(view: View, savedInstanceState: Bundle?) {
        super.onViewCreated(view, savedInstanceState)

        val book = args.book
        binding.webview.apply {
            webViewClient = WebViewClient()
            settings.javaScriptEnabled = true
            loadUrl(book.url)
        }
    }

    override fun onPause() {
        binding.webview.onPause()
        super.onPause()
    }

    override fun onResume() {
        super.onResume()
        binding.webview.onResume()
    }

    override fun onDestroyView() {
        _binding = null
        super.onDestroyView()
    }
}
¶ Jetpack Navigation Backstack
한가지 체크할 사항으로 이렇게 책의 상세정보를 BookFragment로 보여주면 Bottom Navigation이 의도한 것과 다르게 동작하는 것처럼 보이게 됩니다. 예를 들어 SearchFragment에서 BookFragment를 띄운 상태에서 FavoriteFragment로 갔다가 다시 SearchFragment로 돌아오면 SearchFragment가 아닌 BookFragment가 뜨게 되고 아이콘도 전환되지 않게 됩니다.
이 앱에서는 Jetpack Navigation으로 Bottom Navigation을 제어할 때 setupWithNavController를 사용했는데요, 공식 홈페이지의 설명에 따르면 setupWithNavController는 메뉴 사이를 이동할 때 각 상태를 backstack이라는 곳에 저장하고 다시 복원하는 동작을 하게 되어 있습니다.
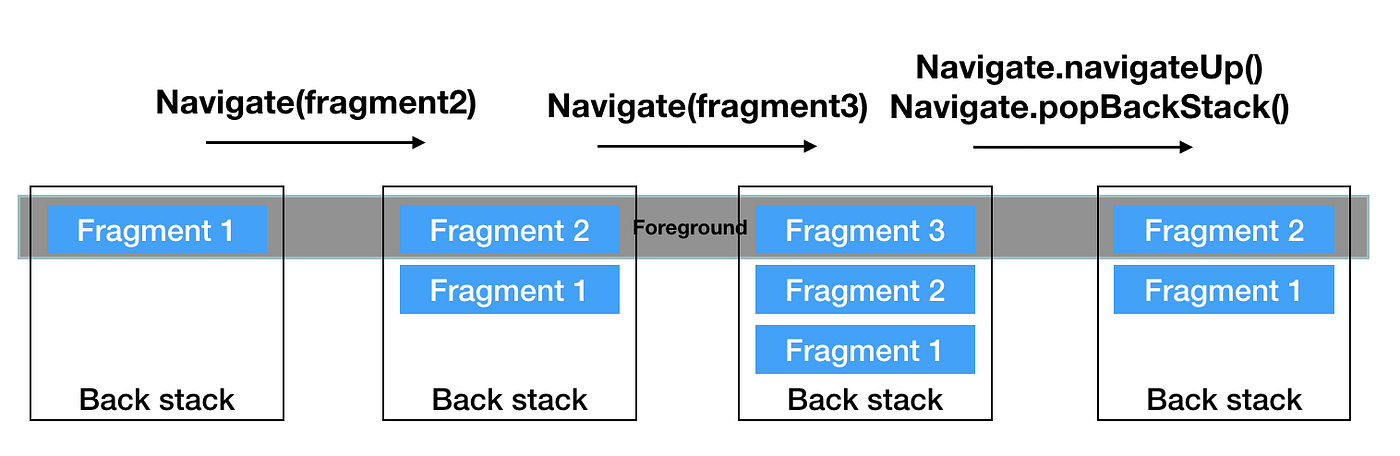
그러니까 BookFragment를 띄운 상태에서 다른 Fragment를 갔다오면 SearchFragment가 아니라 백스택에 저장된 BookFragment가 보이게 되는 것이고 이것은 Jetpack Navigation의 정상적인 동작입니다. 아이콘이 전환되지 않는 것은 BookFragment에 메뉴가 지정되어 있지 않기 때문에 전환되지 않는 것이구요.
우리가 Bottom Navigation의 메뉴 버튼을 눌렀을 때 BookFragment가 아닌 SearchFragment를 바로 보이게 하고 싶다면 프래그먼트를 전환할 때 위에 쌓인 다른 프래그먼트를 한번에 제거해야 합니다. Navigation의 스펙에 따르면 action 기능으로 프래그먼트를 전환할 때 app:popUpTo와 popUpToInclusive 속성을 이용해서 위에 쌓여있는 프래그먼트를 제거할 수 있습니다.
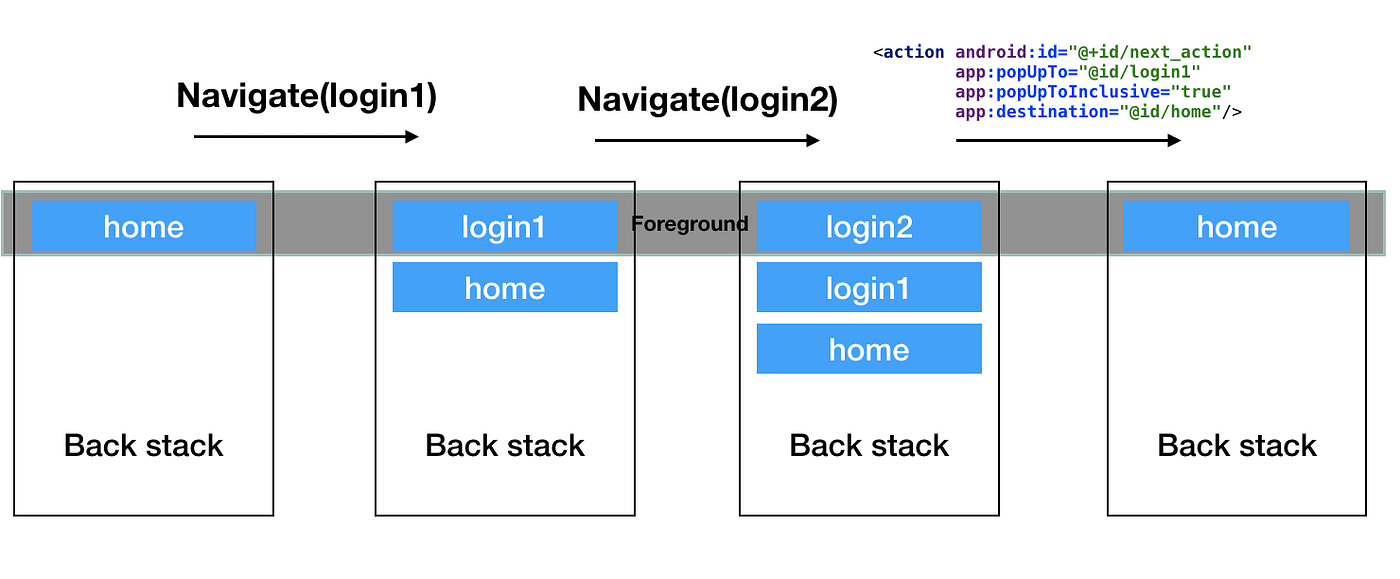
이걸 Bottom Navigation에 적용하기 위해서는 코드를 다음과 같이 변경하면 됩니다. setOnItemSelectedListener 내부에서 onNavDestinationSelected로 클릭된 메뉴아이템을 정확히 표시하도록 하고, popBackStack으로 클릭된 아이템을 스택에서 바로 끄집어 내 표시하도록 하는 것입니다.
- binding.bottomNavigationView.setupWithNavController(navController)

+ binding.bottomNavigationView.apply {
+     setupWithNavController(navController)
+     setOnItemSelectedListener { item ->
+         NavigationUI.onNavDestinationSelected(item, navController)
+         navController.popBackStack(item.itemId, inclusive = false)
+         true
+     }
}