이번 영상에서는 Repository Pattern에 대해 알아보도록 하겠습니다.
¶ Repository Pattern의 정의
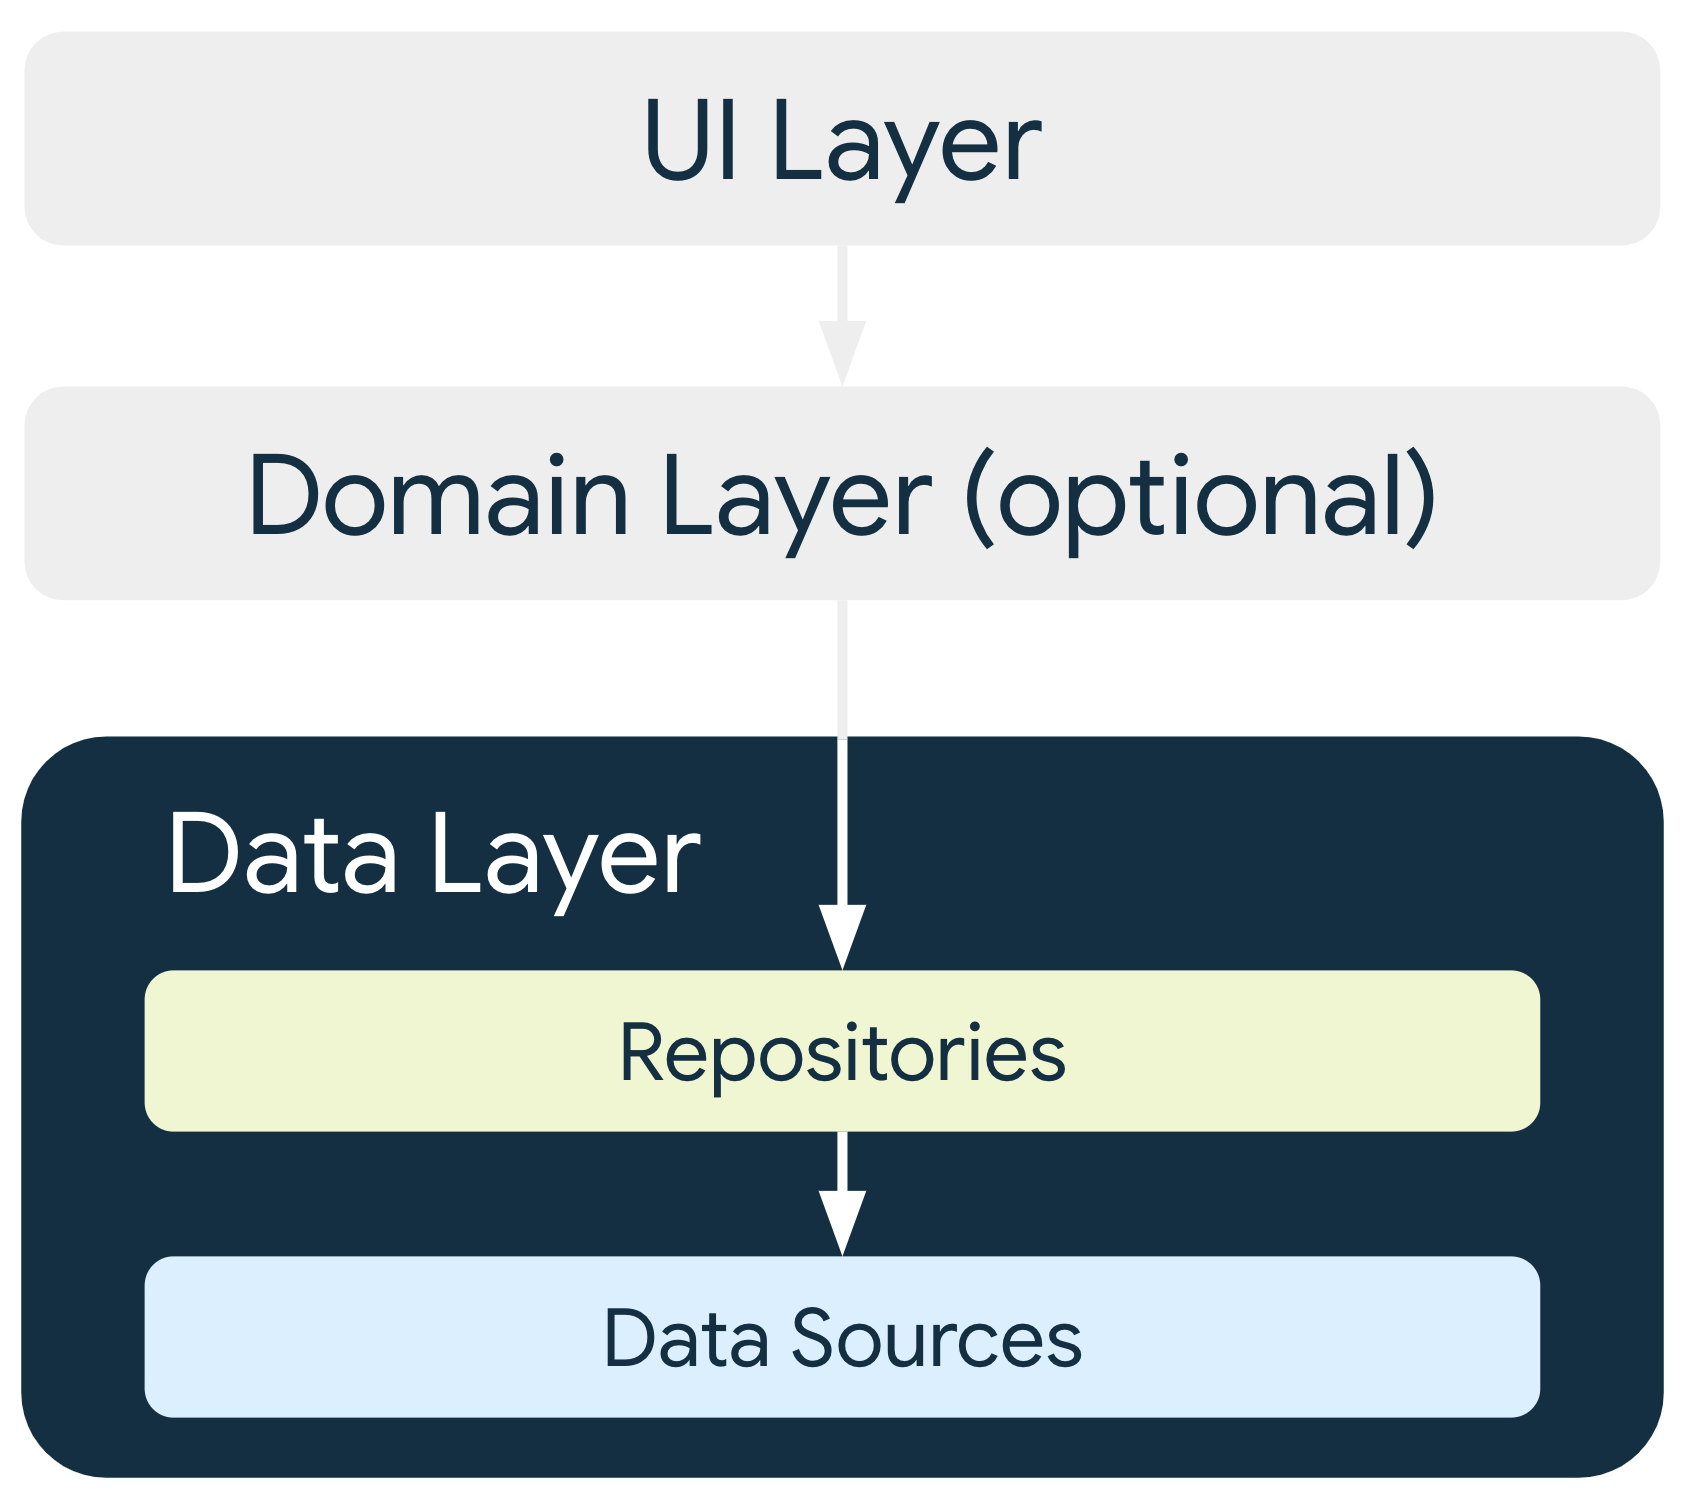
Android Developers의 Guide to app architecture에 따르면 UI 레이어와 데이터 소스 사이에는 그림과 같이 Repository를 두도록 정의하고 있습니다.
그렇다면 Repository란 무엇일까요? Patterns of Enterprise Application Architecture에서는 Repository를 다음과 같이 정의하고 있습니다.
A Repository mediates between the domain and data mapping layers, acting like an in-memory domain object collection. Client objects construct query specifications declaratively and submit them to Repository for satisfaction. Objects can be added to and removed from the Repository, as they can from a simple collection of objects, and the mapping code encapsulated by the Repository will carry out the appropriate operations behind the scenes. Conceptually, a Repository encapsulates the set of objects persisted in a data store and the operations performed over them, providing a more object-oriented view of the persistence layer. Repository also supports the objective of achieving a clean separation and one-way dependency between the domain and data mapping layers.
데이터가 로컬 DB인지 웹 응답인지에 관계없이 동일한 인터페이스를 통해 데이터에 접근할 수 있게 하는 구조를 Repository Pattern이라 하고, 데이터에 접근하는데 필요한 논리를 캡슐화한 것을 Repository 라고 합니다. Repository Pattern을 도입하는 가장 중요한 이유는 데이터 본체와 데이터 로직을 분리함으로써 각 코드 사이의 결합도를 낮추는 것입니다.
¶ 안드로이드 앱 아키텍처와 Repository
클라이언트가 API를 통해 서버와 통신할 때 서버 내부에서 데이터에 대해 어떤 작업이 일어나는지 알지 못하고, API에 정의된 조작밖에 할 수 없지요. 앱 아키텍처에서는 ViewModel이 클라이언트가 되고 데이터 소스가 서버가 된다고 생각하면 됩니다. 이 때 Repository는 서버의 API로서의 역할을 하게 되는 것입니다.
데이터 소스가 로컬기기안에 저장된 SQLite 데이터인지, 아니면 웹 API로부터 다운로드한 데이터인지는 ViewModel에게 중요하지 않습니다. ViewModel은 필요한 데이터를 그저 Repository에 요청할 뿐이고 Repository에서 정의한 조작만을 할 수 있습니다. Repository를 사용함으로써 ViewModel과 데이터 레이어와의 결합이 약해지고 자신의 로직 처리에만 집중할 수 있게 되는 것입니다.
¶ Repository 패턴 구현
그럼 LiveData를 설명하는 강의에서 만들었던 카운터 앱에 Repository를 도입해보도록 하겠습니다. 구글의 앱 아키텍처 가이드에 따르면 앱은 다음과 같이 화면을 표시하는 Presentation Layer와 데이터를 처리하는 Data Layer로 나눌 수 있습니다.

여기서는 Repository 개념설명에 집중하기 위해 Data Layer 앞단인 Repository 까지의 구현에 대해서만 설명하겠습니다. 그림에서 Data Source를 준비하고 Repository에 연결하는 부분은 이미 되어있다고 가정하여 생략합니다.
¶ 인터페이스 정의
Repository는 일종의 API와 같은것이므로, 우선은 API의 내용을 인터페이스에 정의합니다. 여기서는 DB에서 가져온 데이터를 반환하는 getCounter와, 카운터 값을 증가시키는 increaseCounter 두 개의 메소드를 정의합니다.
interface MyRepository {
    fun getCounter(): LiveData<Int>
    fun increaseCounter()
}
¶ 인터페이스 구현
다음은 이 인터페이스를 구현하는 클래스를 작성합니다. 일반적으로는 인터페이스에 Impl을 붙인 이름을 붙여줍니다.
그리고 Repository가 관리할 DB 데이터가 있어야 합니다. 실제로는 SQL 데이터베이스나 서버의 데이터를 이용하여야 하지만, 여기서는 설명의 편의를 위해 DB에서 가져온 데이터가 liveCounter라고 가정하여 설명하겠습니다.
그러면 데이터를 반환하는 getCounter와, 값을 1 증가시키는 increaseCounter의 내용을 구현하는 것으로 repository의 준비는 끝입니다.
class MyRepositoryImpl(counter: Int) : MyRepository {

    // 이 부분은 실제로는 room이나 retrofit에서 받아오게 됨
    private val liveCounter = MutableLiveData<Int>(counter)

    override fun getCounter() : LiveData<Int> {
        return liveCounter
    }

    override fun increaseCounter() {
        liveCounter.value = liveCounter.value?.plus(1)
    }
}
¶ ViewModel과 연결
이제 ViewModel은 Repository를 통해서만 데이터를 다루어야 합니다. 그러기 위해서 ViewModel에서는 자신이 참고할 Repository를 생성자로 받아야 합니다.
화면에 표시할 liveCounter를 Repository에서 받아오도록 repositoryImpl.getCounter()로 정의합니다. 그리고 increaseCounter도 동일하게 Repository의 기능을 사용하도록 정의해 줍니다.
class MyViewModel(
+    private val repositoryImpl: MyRepositoryImpl
    ): ViewModel() {

+    val counterFromRepository : LiveData<Int> = repositoryImpl.getCounter()

+    fun increaseCounter() {
+        repositoryImpl.increaseCounter()
+    }
}
그리고 xml 화면에서 counterFromRepository를 표시하도록 변경합니다.
<TextView
    android:id="@+id/textView"
    android:layout_width="wrap_content"
    android:layout_height="wrap_content"
+    android:text="@{viewmodel.counterFromRepository.toString()}"
    android:textAppearance="@style/TextAppearance.AppCompat.Large"
    app:layout_constraintBottom_toBottomOf="parent"
    app:layout_constraintLeft_toLeftOf="parent"
    app:layout_constraintRight_toRightOf="parent"
    app:layout_constraintTop_toTopOf="parent" />
¶ ViewModelFactory 생성자 수정
ViewModel이 생성자로 repository를 받아야 하니 ViewModelFactory도 그에 맞게 수정해 줍니다.
@Suppress("UNCHECKED_CAST")
class MyViewModelFactory(
    private val counter: Int,
    owner: SavedStateRegistryOwner,
+    private val repositoryImpl: MyRepositoryImpl,
    defaultArgs: Bundle? = null,
) : AbstractSavedStateViewModelFactory(owner, defaultArgs) {
    override fun <T : ViewModel?> create(
        key: String,
        modelClass: Class<T>,
        handle: SavedStateHandle,
    ): T {
        if (modelClass.isAssignableFrom(MyViewModel::class.java)) {
+            return MyViewModel(counter, handle, repositoryImpl) as T
        }
        throw IllegalArgumentException("Viewmodel class not found")
    }
}
¶ MainActivity에서 사용설정
마지막으로 메인액티비티를 수정합니다. myRepositoryImpl 인스턴스를 작성합니다. myViewModel을 생성할 때 이 인스턴스를 전달해주고, 버튼을 클릭했을 때 리포지토리에 정의된 함수를 실행하도록 하면 됩니다. 라이브데이터를 옵저빙하던 코드는 주석처리하여 줍니다.
+ val myRepositoryImpl = MyRepositoryImpl(100)
+ val factory = MyViewModelFactory(10, myRepositoryImpl, this)
val myViewModel = ViewModelProvider(this, factory).get(MyViewModel::class.java)

myViewModel.liveCounter.observe(this, Observer { counter ->
    binding.textView.text = counter.toString()
})

binding.button.setOnClickListener {
+    myViewModel.increaseCounter()
}

// 라이브데이터 옵저빙
-myViewModel.liveCounter.observe(this) { counter ->
-    binding.textView.text = counter.toString()
-}

// 라이브데이터 값 변경
-myViewModel.modifiedCounter.observe(this) { counter ->
-    binding.textView.text = counter
-}
이렇게 해서 Repository Pattern을 이해하고 앱에 적용하는 법에 대해 알아보았습니다.